
Even amateurs these days can produce a
well designed and very impressive fashion flyer designs. In this
tutorial, I will talk about how you can design your own fashion sale portrait flyer using Adobe Photoshop.
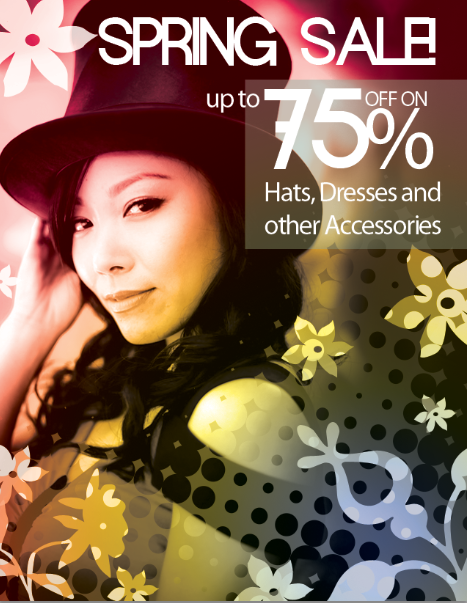
Final Image
Even amateurs these days can produce a well designed and
very impressive fashion flyer designs. Besides good fashion photography,
it is about adding the right effects and filters that will add that
chic look into the ad. In this tutorial, I will talk about how you can
design your own fashion sale flyer using Adobe Photoshop. Even as an
amateur, you should be able to easily do this on your own.
1. Let us start by setting up our flyer document. In this example we are creating a portrait flyer with the dimensions 4.25x5.5 inches. For printing, a 300 ppi resolution minimum is required for high quality printing. You might also want to change the color mode to CMYK, especially if you plan on having this printed professionally.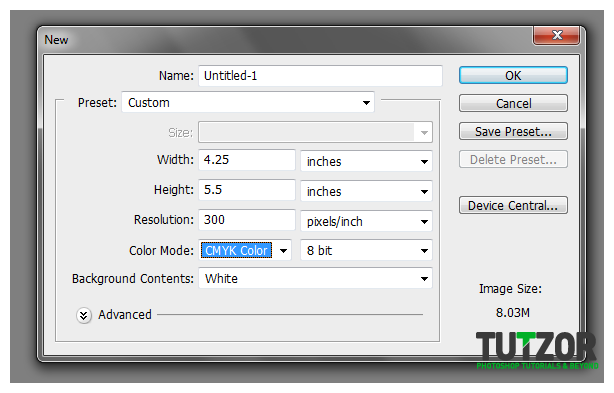
1. Let us start by setting up our flyer document. In this example we are creating a portrait flyer with the dimensions 4.25x5.5 inches. For printing, a 300 ppi resolution minimum is required for high quality printing. You might also want to change the color mode to CMYK, especially if you plan on having this printed professionally.
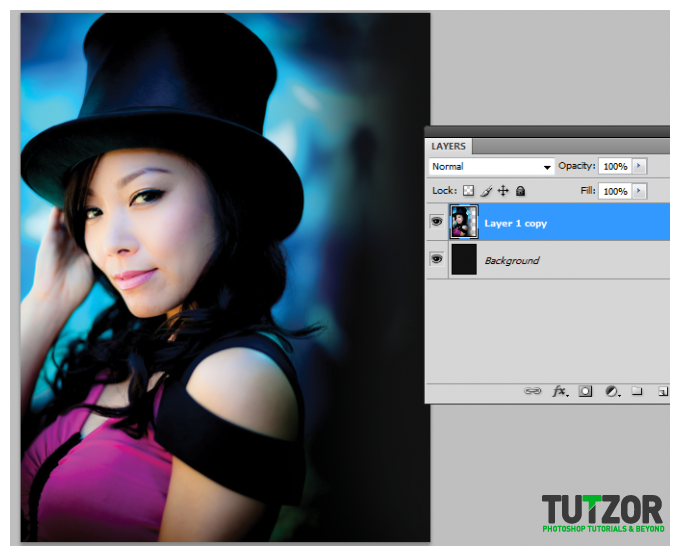
2. Once the document is open, we then paste in our
primary feature image. In this case Tibcris in flickr here.
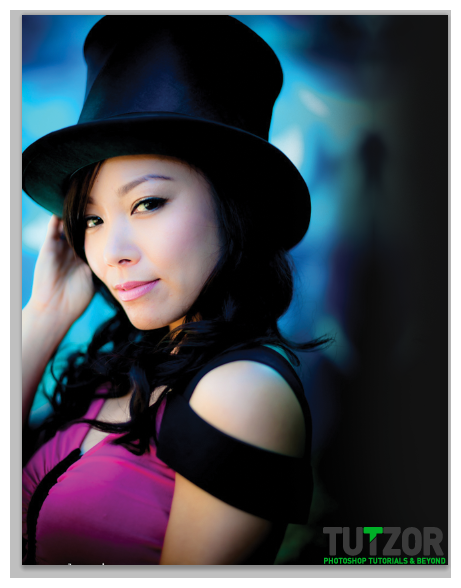
3. To extend the background a bit, we filled the actual
background layer with black. Then, we erased the right part of the main
image with large and soft eraser via the eraser tool. It is in this
space that we will add the text and effects later.
4. Now, create a new layer by pressing CTRL+SHIFT+N.
Name it any layer name you like. Using the gradient tool, apply a Radial
Color Gradient of your choice unto our canvass. Do not worry about it
covering our model now. Just make sure you position the radial gradient
correctly unto the canvass.
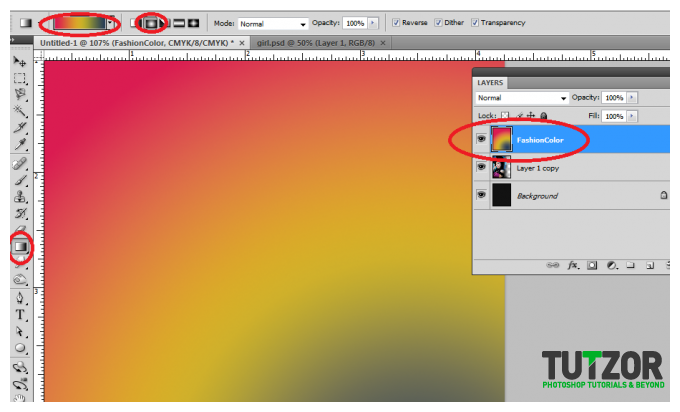
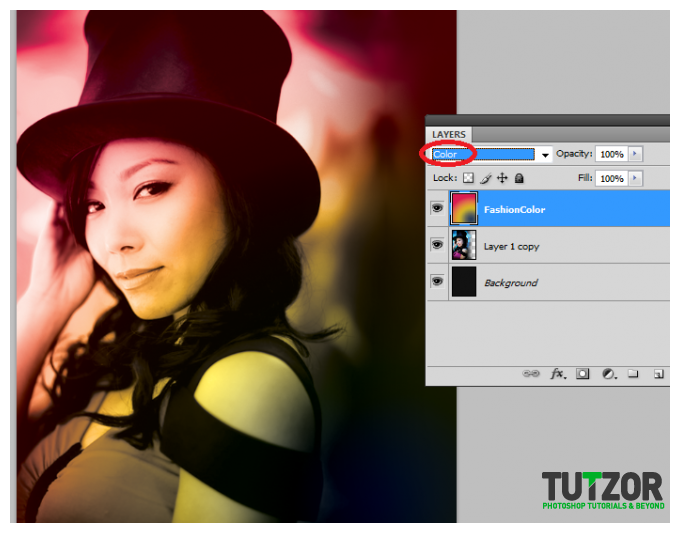
5. Next, change this layer’s blend mode to “Color”.
This applies the colors of the gradient unto our main model image below
for a nice creative effect.
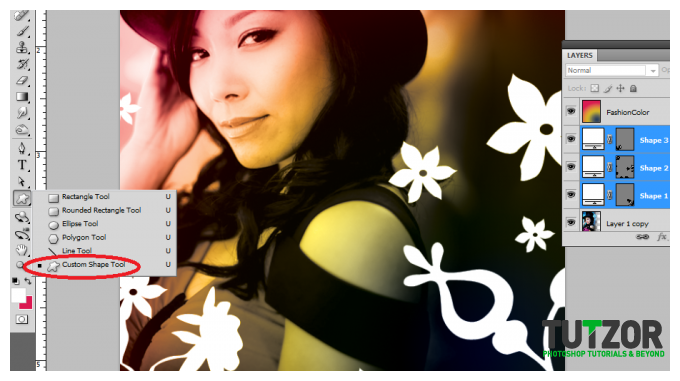
6. Great! Now the next step is to add some details. In
our example, we are making this in time for the “Spring” Fashion season.
So we add some nice floral custom shapes. These shapes are easily
accessible from the Custom Shapes list in Photoshop.
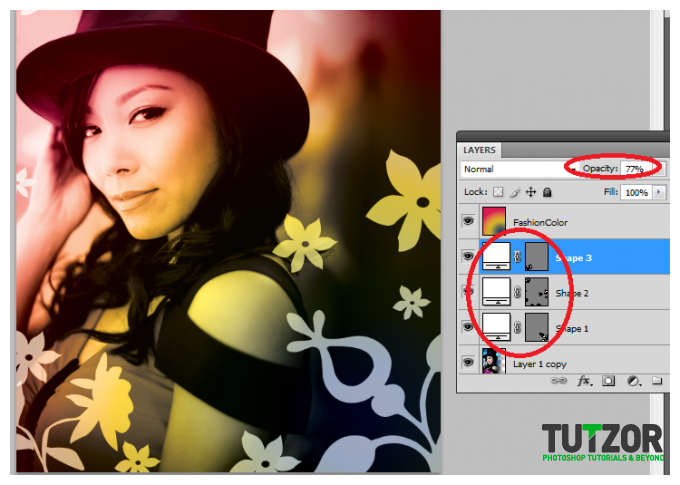
7. Then, alter the opacity value of those different
shapes so that they embed well with the colors and theme that we have
for your full color flyer.
8. Good, now we will add an extra interesting effect.
First create a new layer and name it “halftone”. Do this by pressing
CTRL+SHIFT+N. Then switch to the Channels panel and create a new channel
by clicking on the appropriate icon at the bottom of the panel.

9. Next, use a nice soft brush and paint a few spots of
white unto our new channel. Make sure of course that you have the new
layer you just created when doing this.

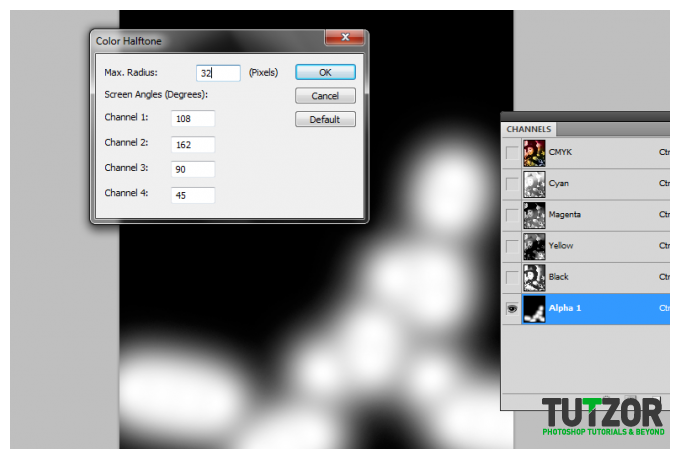
10. Afterwards, go to Filter -> Pixelate -> Color
Halftone. Enter a value of 32 maximum for the Radius, however, you can
lower this a bit as you see fit. Once you are satisfied with the
settings just press OK.
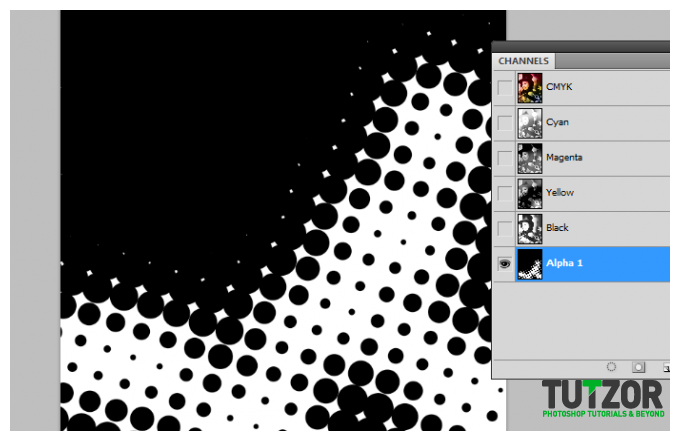
11. Once you press OK, you should have a wonderful looking
halftone pattern where your white blobs used to be.
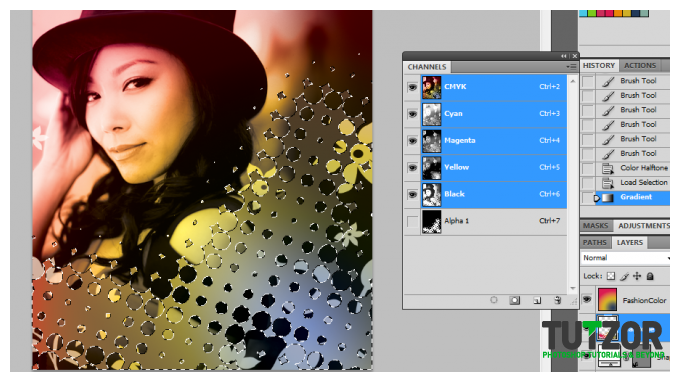
12. Great! Next, hold down the CTRL key and then click on
our Alpha 1 channel image thumbnail. This should select all the areas in
the channel, now go back to the normal view by clicking on our new
layer. Fill the selection with a color gradient from your color themes.
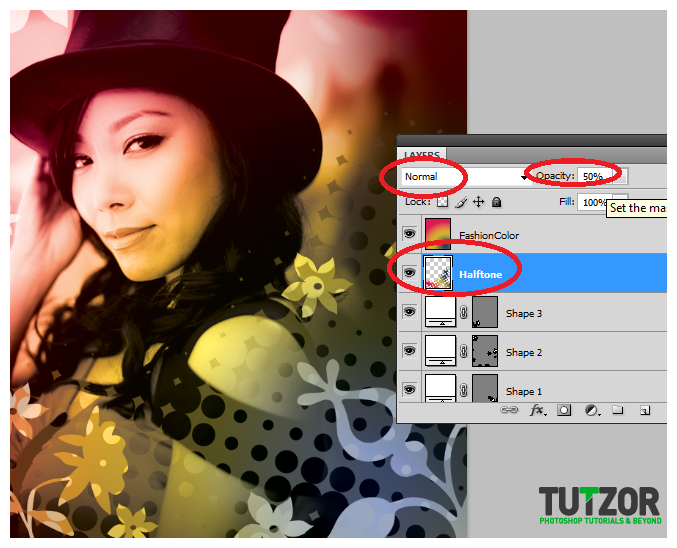
13. To finish of the creative halftone effect, we reduce
the opacity of the layer to around 50%. If needed, you may also erase
some parts of the halftone layer so that you can emphasize anything that
was blocked by the design.
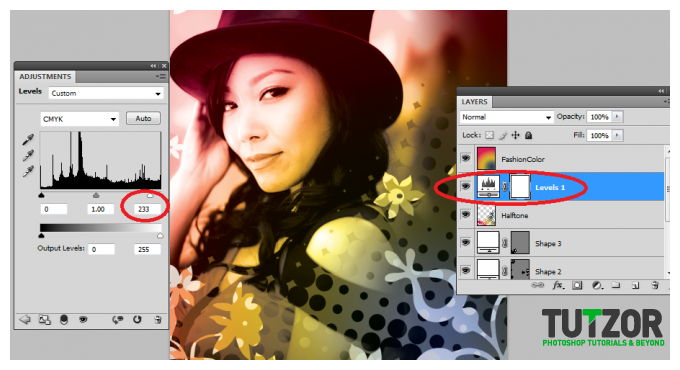
14. Afterwards, we will adjust the lightness of the image.
Go to Layer -> New Adjustment Layer -> levels. Change the value
at the right a bit to lighten our image.
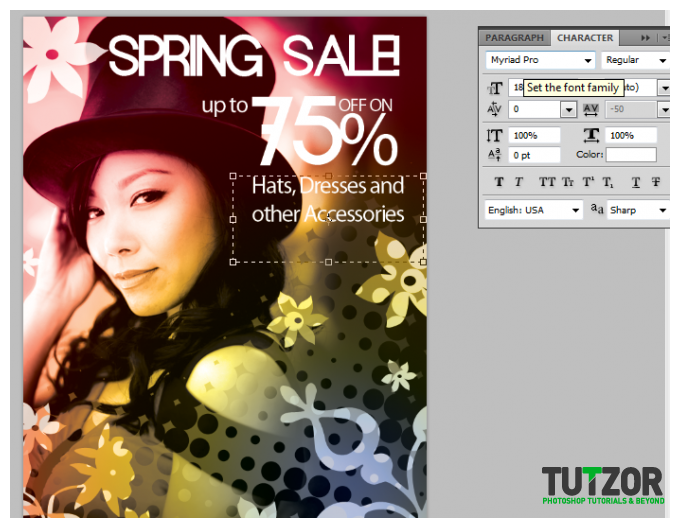
15. Afterwards, you then start typing in the text for the
fashion advertisement flyer. Just choose a nice and clear font style
that is easily understandable. Initially, it is best to use white font
colors so that they are easier to see.
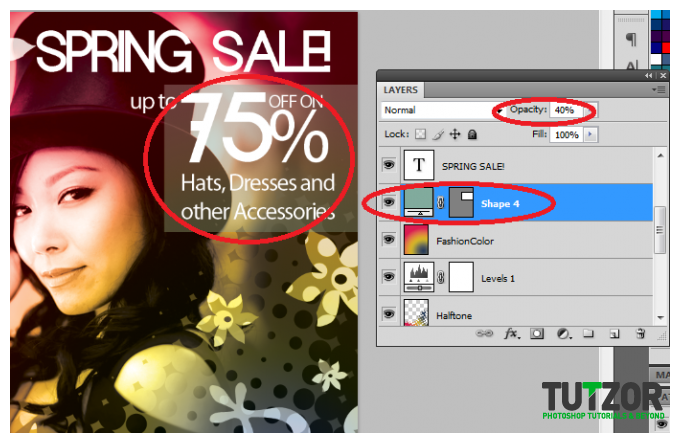
16. If you think some of the text is a bit hard to see
with the white color, use the rectangle shape tool to create a colored
rectangle behind the text. Just reduce the opacity to around 40% and you
will help emphasize the text, making clearer and of course more
noticeable.
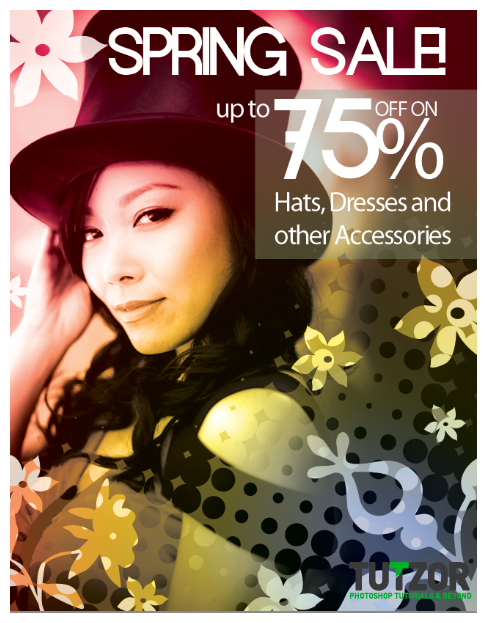
FINAL IMAGE
Once you are done with the text, you should have your nice fashion advertisement flyer done! Congratulations!
Once you are done with the text, you should have your nice fashion advertisement flyer done! Congratulations!
Really, it's very good. Thanks for sharing
ReplyDeleteJewelry photo retouching services| Images Background Remover| Multiple Clipping Path
A very helpful article. Learned a lot. Best wishes!
ReplyDeleteJewelry Retouch
It's really a great and helpful piece of info. I'm glad that you just shared this useful information with us. Please keep us up to date like this. Thank you for sharing.
ReplyDelete