
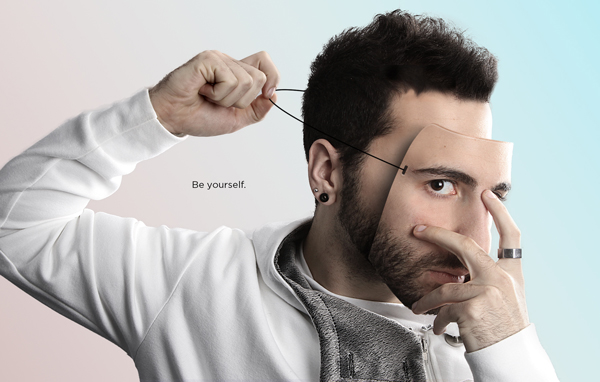
 What You'll Be Creating
In this tutorial, I will show you how to create an eye-catching portrait illusion. This tutorial covers the simple techniques that I used to create a mask out of a photo of my own face. Let’s get started!
1. Create the Background Gradient
Step 1
Create a new document to these specifications.Step 2
Activate the Gradient Tool (G). You might need to click and hold on the Paint Bucket Tool to see it.

Step 3
In the Gradient Menu, click just under the long rectangle somewhere in the middle to add a stop.

Step 4
Double-click on the left paint bucket to open up a color picker menu. Enter in#18ecf6 at the bottom and press OK.
Step 5
Enter in the values for the other to stops.#e3e3e3 the middle and #544540 for the right. Your gradient should now look like this.
Step 6
Lastly, extend the midpoints closer to the ends (the little circles underneath the bar)
Step 7
Drag the gradient from top right corner to bottom left corner and you should be left with something like this.
2. Place the Model
Now that the background is set, you are ready to bring in the model photo and get it ready to be edited.Step 1
Open the model source file and place it into the document. Name it Model.
Step 2
Now it’s time to extract the model from the background. To do so, grab the Quick Selection Tool (W) and set your brush around 35 pixels.

Step 3
Once you have the model fully selected, click on the Refine Edge button at the top of the image.


3. Making the Mask
We have our background and model ready to go, the next step is to start to create the mask.Step 1
Duplicate the model copy layer by pressing Command/Ctrl-J

Step 2
Select the Pen Tool (P) and begin to draw out the outline of the mask. I chose to start at the bottom of the jawline and work my way up around the side of the head to the forehead.


Step 3
Right click anywhere on the image and select Make Selection.
Mask and delete the layer below it that you copied from.
Step 4
With the Mask layer selected, press Command/Ctrl-T to transform this layer. Rotate it slightly by dragging one of the corners and lower it as shown. Once it is in a good spot, press enter.Step 5
Next we are going to add a bit of a shine to the top of the mask to make it look a little bit like plastic. Click on the FX button at the bottom of the Layers panel and select Bevel and Emboss

Step 6
Time to create a slot where the string will go to. Create a mask for this layer by clicking on the mask button at the bottom of the Layers panel.


Step 7
The mask is coming along nicely, but we need to remove that little bit of hair along the edge of the mask. With the mask layer selected, hold the Command/Ctrl button and click on the layer icon. This will select the outer edge of the entire layer.


Step 8
Next we need to add some depth to the mask to make it look more realistic. Start by selecting the Rectangle Marquee Tool (M) and dragging a rectangle over the top edge of the forehead like so:


Step 9
The last thing we need to create for the mask is a shadow. The light source is coming from the right side of the photo, so the shadow will fall to the left. Create a new layer, name it Mask Shadow and move it below the Depth layer.


4. Touching Things Up
We are very close to the end! We just need to fix a few things before finishing it off. We need to remove some of the extra clothing in some areas and remove the eyebrow from the face behind the mask.Step 1
Start by selecting the mask on the Model layer and brushing out the clothing of the arm and the finger in the background. Make sure your brush is black and 100% Opacity.


Step 2
One final touch to the model is removing the eyebrow behind the mask. This gives the effect that a ‘faceless’ man is behind the mask.

5. Create the String
Time to finish this thing off! All that is left is to create the mask's string.Step 1
Create a new layer on top of everything and name it String. Select the Pen Tool (P) and draw a nice curved line as shown. I found it best to start from the back of the head and proceed to the string hole. Remember to go through the fingertips as well.
Step 2
Right click and select Stroke Path.


Step 3
Create a mask on the String layer and brush out the small area by the fingernail. Another area that may need masking is by the string hole.
Conclusion
There you have it! You have successfully completed this tutorial and created an awesome portrait illusion! After learning about various masking techniques, familiarizing yourself with the pen tool and other tools, you can now apply this to other photo ideas and future projects. Experiment with the background, include typography and try different model angles.

Thank you very much for such an interesting post.
ReplyDeleteJewelry photo retouching services|Images Background Remover|Photo Retouch Services|Clipping path service in Bangladesh
Well done! This article made me happy cause I learned a lot from this. keep it up.
ReplyDeleteJewelry Retouch
This comment has been removed by the author.
ReplyDeleteEnjoyed reading the article on top of, explains everything in detail, the article is extremely fascinating and effective to Clipping Path Lab. Thank you and smart luck for the approaching articles.
ReplyDelete