

1. The Setup
Step 1
Create a new document (File > New). It can be any size you like. I used 1280 x 1024px because I want to work with large shapes to create the initial pattern.
Step 2
Go to View > Snap and ensure that Snap is checked.

Step 3
Set up a layer with the swatch colors seen in the image below. This will make your color choosing quicker when it comes to selecting colors for this tutorial.
2. Create and Place Your Shapes
Now that you have the canvas ready and your color swatches prepared, we can start with creating our initial pattern.Step 1
Select the Polygon Tool (U) and click on the right side of the canvas.

Step 2
In your Layers panel with Polygon 1 selected, make the Opacity 50%.
#33cdc7.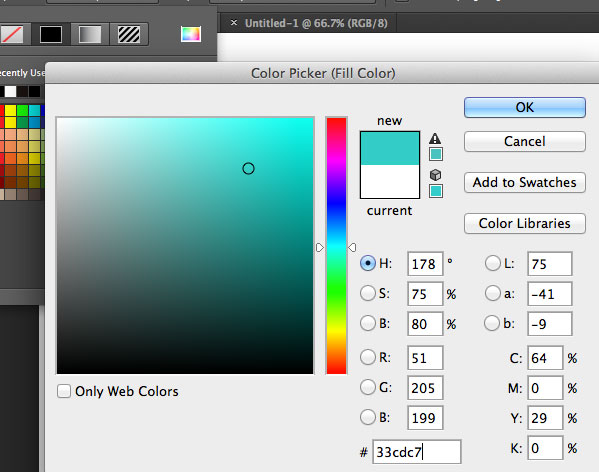
Step 3
With Alt-Shift held, drag Polygon 1 on the canvas to your left until the shape overlaps the original shape as seen below.
Step 4
Change the Fill of Polygon 1 copy to#1d7471, Polygon 1 copy 2 to #5ccdc9, and Polygon 1 copy 3 to #009b95.
Step 5
Select Polygon 1 in your Layers panel and while holding Shift, select Polygon 1 copy 3.
With the 4 shapes still selected, hold Alt-Shift and drag the group on the canvas to the left and align the shapes once more.

Step 6
Now with 12 shapes in total made, create a new Group folder, name it Blue Group, and drag the 12 shapes into this group.

Step 7
Next with the group still selected, hold Alt and drag the group on the canvas up and slightly to the left so that the bottom of the polygons are nested above the original group.

Step 8
Inside the Orange Group you will now recolor all of the polygons to the orange swatches that were setup earlier. From the bottom of the Orange Group up, the pattern of colors need to be#ffb173, #ff7100, #ff9540, and #bf6f30.
Step 9
Shift drag the Orange Group down so that it overlaps the Blue Group a little more than half way.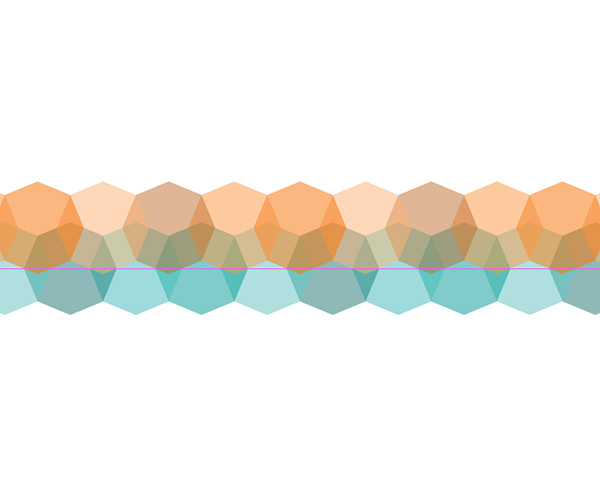
Step 10
Select both the Blue and Orange groups and bring them down so that roughly three quarters of the Blue Group is off the canvas.
Step 11
With both groups still selected and Alt-Shift held, drag them up on the canvas so that the shapes overlap in a repeating pattern as reflected in the image below. Repeat this step until you’ve filled the canvas.
Step 12
Fill the Background layer with#d5f7fc, then Create a new layer above all of the groups and fill that with #152907 and set that layer to Subtract.

3. Define the Pattern
All right, you have your color fills, shapes overlapping, and a pretty good idea how this pattern is going to look. Now we’re going to define this pattern so it can be applied to anything you make in the future.Step 1
Select the Rectangular Marque Tool (M).

Step 2
With the area of the pattern selected, go to Edit > Define Pattern.

Step 3
Create a new document (File > New) with whatever dimensions you like. I went with 2000 x 2000px.

Step 4
With Layer 1 selected in your Layer panel, choose Pattern Overlay in Layer Styles.
If everything was selected correctly, your pattern should appear seamless. If not, go back to the original document and try to make a couple adjustments to the selection and define a new pattern.

Conclusion
In this tutorial, I showed you how to create a seamless geometric pattern in Photoshop that you can use on any new object you create in Photoshop. I hope this was a good learning experience, and you can use what you learned to continue to experiment with layer orders, color patterns, and blending modes. Depending on what you choose, you may discover new shapes in your basic geometric patterns. Have fun!
Fantastic Work!!
ReplyDeleteMultiple Clipping Path
Enjoyed reading the article on top of, explains everything in detail, the article is extremely fascinating and effective to Clipping Path Lab. Thank you and smart luck for the approaching articles.
ReplyDelete